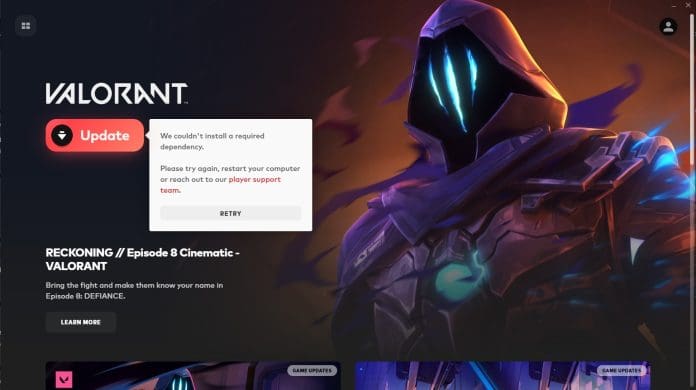
Valorant players are no strangers to encountering errors, but one particularly persistent issue that has been plaguing gamers is the “We couldn’t install a required dependency” error. This error can halt the installation or update process, preventing players from launching and enjoying their favorite tactical shooter. If you’re facing this roadblock, don’t worry – you’re not alone, and fortunately, several proven fixes can get you back in the game.
What Causes the “We Couldn’t Install a Required Dependency” Error?
This error message typically arises during the initial installation of Valorant or when applying game updates. The root cause often lies with Riot Vanguard, Valorant’s anti-cheat system, which is a crucial dependency for the game to function. Conflicts or corrupted files related to Vanguard can trigger this error, disrupting the installation process.
Several factors can contribute to this dependency issue:
- Corrupted Vanguard Installation: A previous installation of Vanguard might be corrupted or incomplete, leading to conflicts during a new installation or update.
- Outdated Vanguard Files: The Riot Games client might be attempting to install an outdated version of Vanguard, causing incompatibility issues.
- Conflicting Software: Other software or processes running in the background might interfere with the Vanguard installation.
- System Permissions: Insufficient administrative privileges can sometimes prevent the proper installation of dependencies.
Troubleshooting Steps to Fix the Error
Here are effective methods to resolve the “We couldn’t install a required dependency” error and get Valorant running smoothly again:
Quickest Fix: Uninstall/Reinstall Riot Vanguard
The most frequently recommended and often successful solution is to uninstall and then reinstall Riot Vanguard. This forces the Riot Games client to download and install the latest, clean version of the anti-cheat software.
Follow these steps:
- Uninstall Vanguard:
- Close the Riot Games client and Valorant completely. Ensure they are also closed from the system tray.
- Open the Control Panel on your Windows system.
- Navigate to “Uninstall a program” (or “Programs and Features”).
- Locate “Riot Vanguard” in the list of installed programs.
- Select “Riot Vanguard” and click “Uninstall”. Follow the on-screen prompts to complete the uninstallation.
- Restart Your Computer: It’s crucial to restart your system after uninstalling Vanguard to ensure the process is fully completed.
- Launch the Riot Games Client: After restarting, open the Riot Games client. It should automatically detect the missing Vanguard and begin reinstalling it.
- Allow Updates: Let the Riot Games client install all available updates, including Vanguard. This process might take a few minutes.
In most cases, reinstalling Vanguard using these steps resolves the dependency error. Once the installation is complete, launch Valorant and check if the error is gone.
Advanced Fixes (If Reinstalling Vanguard Doesn’t Work)
If the above quick fix doesn’t solve the problem, you can try these more advanced methods:
- Modify Registry Settings: Some players have reported success by modifying a specific registry setting related to Vanguard. This involves using the Registry Editor (regedit) and creating or modifying a DWORD (32-bit) Value named “DevOverrideEnable” with a value of 0 or 1. (Caution: Modifying the registry incorrectly can cause system instability. Proceed with caution and create a system restore point before making changes.) Refer to online guides for detailed steps if you choose this method.
- Use Autoruns to Disable Conflicts: The Autoruns tool from Microsoft Sysinternals can help identify and disable potentially conflicting processes that might be interfering with Vanguard. After running Autoruns, look for red or yellow highlighted entries and uncheck them. Restart your PC and try launching Valorant again.
- Reinstall Valorant: As a last resort, uninstalling and reinstalling the entire Valorant game can resolve deeper installation issues. Uninstall Valorant through the Control Panel, restart your system, and then download and reinstall the game from the official Valorant website.
The “We couldn’t install a required dependency” error in Valorant can be a frustrating hurdle, but it’s usually solvable with the right troubleshooting steps. Starting with the simplest solution – uninstalling and reinstalling Riot Vanguard – is often the most effective approach. If the error persists, exploring the advanced fixes like registry modification or using Autoruns might be necessary.
By following these guidelines, you should be able to overcome this error and get back to enjoying the competitive world of Valorant. If you continue to experience issues, reaching out to Riot Games support might be the next best step for personalized assistance.


